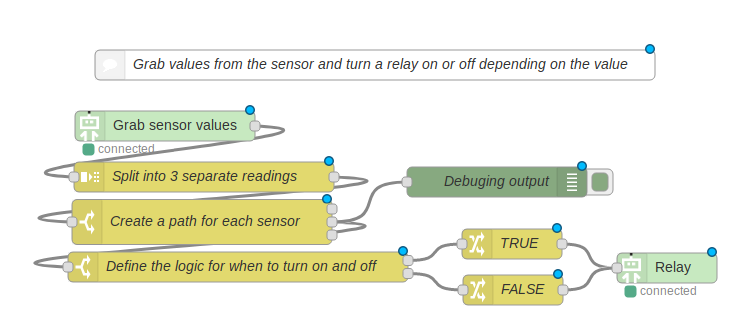
Code
[{"id":"62fe706e.0a6848","type":"tab","label":"Relay Control","disabled":false,"info":""},{"id":"33d46cb5.1d88ec","type":"grove digital output","z":"62fe706e.0a6848","name":"Relay","board":"ea1a4f77.d292a","pin":"8","x":749,"y":367,"wires":[]},{"id":"fda3ab02.84ac68","type":"switch","z":"62fe706e.0a6848","name":"Define the logic for when to turn on and off","property":"payload","propertyType":"msg","rules":[{"t":"gte","v":"50","vt":"str"},{"t":"lt","v":"50","vt":"str"}],"checkall":"true","repair":false,"outputs":2,"x":320,"y":366,"wires":[["f46ccdf1.48951"],["abe238ed.a6ec3"]],"outputLabels":["Over","Under"]},{"id":"f46ccdf1.48951","type":"change","z":"62fe706e.0a6848","name":"TRUE","rules":[{"t":"set","p":"payload","pt":"msg","to":"true","tot":"bool"}],"action":"","property":"","from":"","to":"","reg":false,"x":594,"y":343,"wires":[["33d46cb5.1d88ec"]]},{"id":"abe238ed.a6ec3","type":"change","z":"62fe706e.0a6848","name":"FALSE","rules":[{"t":"set","p":"payload","pt":"msg","to":"false","tot":"bool"}],"action":"","property":"","from":"","to":"","reg":false,"x":595,"y":389,"wires":[["33d46cb5.1d88ec"]]},{"id":"4d353de7.4886ec","type":"grove digital sensor","z":"62fe706e.0a6848","name":"Grab sensor values","board":"ea1a4f77.d292a","sensor":"dht11","repeat":"300","pin":"7","x":247,"y":225,"wires":[["4e64f9bf.e45d48"]]},{"id":"4e64f9bf.e45d48","type":"split","z":"62fe706e.0a6848","name":"Split into 3 separate readings","splt":"\\n","spltType":"str","arraySplt":1,"arraySpltType":"len","stream":false,"addname":"topic","x":286,"y":276,"wires":[["5ce43c9c.ac7594"]]},{"id":"5ce43c9c.ac7594","type":"switch","z":"62fe706e.0a6848","name":"Create a path for each sensor","property":"topic","propertyType":"msg","rules":[{"t":"eq","v":"temperature","vt":"str"},{"t":"eq","v":"humidity","vt":"str"},{"t":"eq","v":"heatIndex","vt":"str"}],"checkall":"true","repair":false,"outputs":3,"x":284,"y":321,"wires":[[],["fda3ab02.84ac68","8c9bf0e9.b4b398"],[]]},{"id":"8c9bf0e9.b4b398","type":"debug","z":"62fe706e.0a6848","name":"Debuging output","active":true,"tosidebar":true,"console":false,"tostatus":false,"complete":"payload","x":579,"y":281,"wires":[]},{"id":"4aba096c.ce69a8","type":"comment","z":"62fe706e.0a6848","name":"Grab values from the sensor and turn a relay on or off depending on the value","info":"","x":457,"y":164,"wires":[]},{"id":"ea1a4f77.d292a","type":"board-config","z":"","board":"GrovePi"}]
You should be able to copy and paste this code using Node-RED’s Import > Clipboard menu option. I am using the “Temperature&Humidity Sensor” v1.2 on port D7 and the “Relay” v1.2 on port D8 but you can just configure the options in the nodes.